After a home remodel/power surge that destroyed my last computer ....I am bound and determined to begin adding photos and events to this blog! This means I have to get better at remembering to take pictures as well...I don't always get pictures in digital form from the photographers I work with (so forgive the unprofessional pics!) These are meant to keep you in the loop as to what I have been up to and to hopefully inspire you to be CrEAtiVe with your next party or event! I will be digging thru the "archives" of events over the next few weeks and hope to be updated over the next month or so.
My first post is a recent wedding that my wonderful planner friend, Rachel Ruth and I did together.....It was filmed for the TLC show "Four Brides" that will air at the end of September.

This was the sign as you entered in...all guests were agreeing to be filmed!
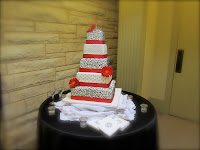
This bride was awesome to work with...so open to creative ideas and thinking out of the box. I had found a few vintage bibles and hymnals at the flea market a few months ago and I have been dying to turn them into something fabulous! Here was my chance....the colors were black and white with pops of red.
We wanted to see what could accomplish with things we already had - so we grabbed the vintage books, bibles and hymnals along with old log journals and writings from the 1920's and mixed them with coffee filters, wax paper, scrapbook paper, tissue paper and went to work! I designed fabulous flowers made out of a mix of all these papers, trimmed with pinking shears and held together in the center with a brad. We also added clips to the back.
Take a look at some of our creations:


We took these flowers and clipped them to the branches of some of the tall centerpieces for the guests tables. The bright apples gave us our pops of red (thanks Rachel and Joey!) and they filled the room with a fresh, sweet fragrance.

Its a little hard to see since the lights were still up and the hanging candles weren't lit - but you get the picture!
We also created an awesome candy bar with mixed apothecary jars and loads of stamped paper.....I purchased good old snow cone holders from a restaurant supplier and used that as our base to hold Kettle Korn...I opened one up to use as a pattern and cut mixed papers to fit. We just wrapped them on and stapled....some got the added decoration of the red twistie ribbon glue gunned to the top. yummy!

From experience, I have realized that a mock set up for the candy bar is really helpful. That way you bring exactly what you need for the types of candy that you have...some things need jars, some need cake plates, etc. You can just write the names on a post it note/stick it on the jar/ and wrap up for travel. Even if you mix things differently when you get there - at least you have what you need!

I found these incredible plexiglass cone holder stands at a restaurant supplier as well...they even stack to give you two layers!


The Bride and her friend, Allison put together our "milk and cookies" sign....scroll down to see how it looked at the wedding!

Wedding Design day! All the bridesmaids chipped in to help out!


Here are some pics of the "milk and cookies" station at the wedding.....
Home made cookies filled each jar and vintage jugs of milk were iced down in a old white wagon. A set up of chocolate and strawberry syrups with vanilla and chocolate malt mixes were available to mix your own drink.
The napkins at this station were printed with "a + g = love" and the short straws had paper flags wrapped around them...so sweet.
We designed a lounge area to fit in between the candy bar and cookie station and once the lights dimmed and the candles were lit...it was amazing! I used sticky felt to cut out the letters for the pillows (the white pillows are just the inserts!) and we stitched the corners with bright red yarn (use a big needle and a thimble for this!)
The food tables were center stage...a tall arrangement with branches, paper flowers and hanging candles filled the center.
You can see the edge of the black and white checked dance floor....and we made some cool signs (courtesy of lola lorena social supply) to serve as backdrops and keep guests off the stage area. The LOVE sign is linked together by a paper garland inspired by an Anthro window (love it!)
Next up for discussion...the photo booth! Hopefully, when we get more professional pictures in, I can show you more detail! It turned out so cute - with 2 large old black shutters as the backdrop and a bright red desk full of props. We had a chalkboard to write a message to the bride and groom, feather boa's, black and white umbrella, painted frames to "frame" your face, and really cute glasses and mustaches made out of scrapbook paper (designed by sweet Allison). We just cut them out and glued a skinny dowel stick to the side...guests could hold them up to their faces like a masquerade mask! Brilliant...and super fun!
We used another area to print out the pictures as the party was going on - and we clipped them on display racks with red clothespins for guests to pick up and put in a book for the bride and groom. Good times...good memories.
Another idea: if you have a space that is not well lit or lacks in personality - think about adding in mixed lamps. Lamplighting is beautiful! Just remember your extension cords (and ask the venue how much power can be taken out of each plug...dont want to blow a fuse!) Also - bring carpet tape to tape down cords along the back wall. Remember to never run cords across a high traffic area!
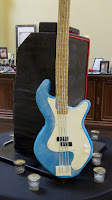
Here are their cakes......the grooms cake was about 3 ft tall and the top half was styrofoam in the inside. It was completely covered in black fondant and had a pvc pipe running through the middle. This may be the only time I make it on camera (me...and rachel...cutting this cake!) It was interesting to say the least. We had to surgically remove all the black fondant so the guests wouldn't be walking around with black teeth! And cut through the top part to remove the styrofoam layer. It took about 15 minutes to even get to the cake :)
But, I did love the groom...and this cake made him very happy!
Beautiful tables...they turned out so well. Just balance a glass tabletop on a circle of apples and wrap mixed height glass vases with paper - fill with candles and voila! beauty.
Well - I hope you liked my first detailed event post! I will try to keep them coming....leave me comments if you have DIY questions - I am happy to share information!

No comments:
Post a Comment